


Tutorial: Sponge Gradient Nail Art
Hi ladies! In this post, I'm gonna show you how to create gradient nails using sponges. If you remember, I've already posted quite a few gradient NOTD's. In some of them, I just used the brush technique, and you can read more about that *here.* I find the brush technique easier to do than sponging, but sponging gives a more blended gradient. So what I sometimes do is combine the two techniques in creating my gradient nails :)

I like this technique because I have more control in blending. I'm more used to sponging on one color at a time. And here I'm just showing you the basic sponge method. You can modify it to suit the design you're going for :)
Note: I updated this post. To see my old sponge gradient tutorial, click *here.*

You will need:
- nail art/cosmetic sponges
- a base coat
- a top coat
- a glitter nail polish (optional)
- 2-3 shades of nail polish - for monochromatic schemes, choose at least one light and one dark shade; you can use just one nail polish if that shade is pretty sheer
- nail polish removers and cotton pads or Q-tips
- a small plate or a piece of paper/cardboard


I've used two kinds of sponges in doing my gradient nails so far, and both work pretty well.

Regular cosmetic sponges - I got these in a huge pack of assorted ones from Saizen. Look, there's even a heart-shaped sponge. Cute! :D

Nail art sponges - I also got this at Saizen, but I think Etude House also sells sponges like these. These are more porous and they'll give your design a more 'gritty' look.
Here's a video tutorial I prepared. Scroll down later for a a step-by-step picture-guided tutorial.
List of products used:
- Base coat - The Face Shop Nail Base Coat
- Cream base color - L.A. Colors Nail Lacquer in French Cream
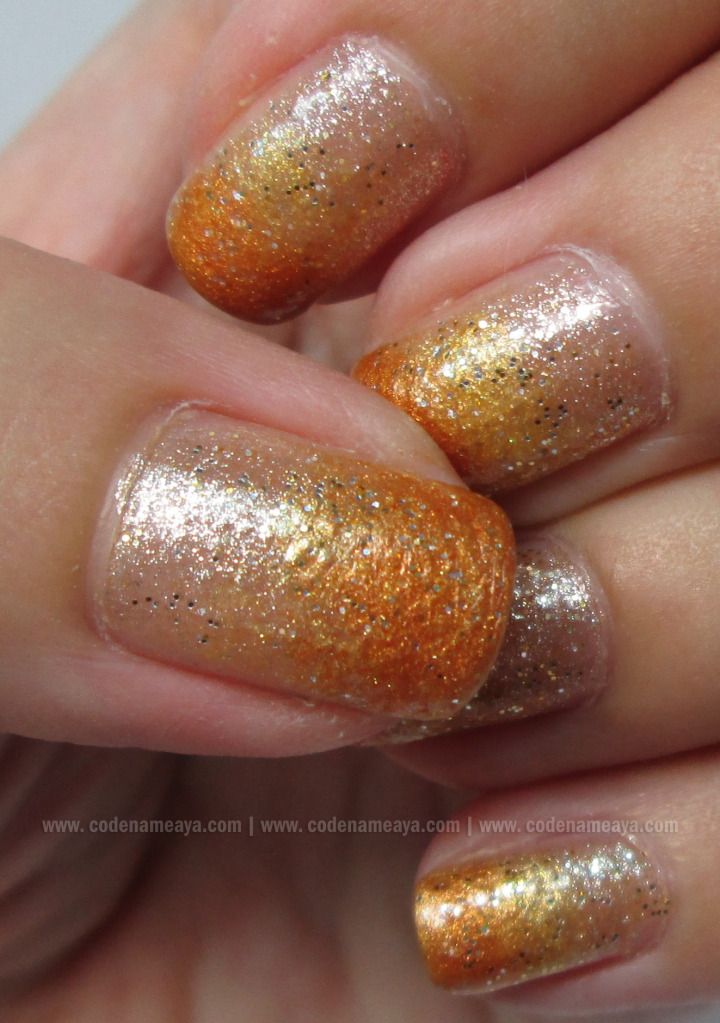
- Gradient polish 1 - Etude House Dear My Blooming Nails #4
- Gradient polish 2 - Etude House Dear My Blooming Nails #3
- Gradient polish 3 - E.L.F. Nail Polish in Hot Pink
- Glitter nail polish - Wish Nail Polish #15
- Top coat - The Face Shop Nail Top Coat
- Nail polish remover - Etude House Nail Remover in #2
- Cosmetic/Nail art sponges - Saizen
There are many ways on how you can sponge on a gradient on your nails but here's how I like to do it. I find this technique easier for monochromatic theme. Here you have more control in the blending of the colors :)
1. Apply base coat to prevent your nails from staining. This would also help make the polish stick on more easily on your nails. I find sponging on bare nails to be harder.
2. Take the lightest gradient shade and get some of it on the sponge. You can choose to directly apply it on the sponge using the brush, or you can put a few drops on a plate and dab the sponge on the plate to pick up the color - which ever works for you.
3. Dab the sponge on your nail to transfer the polish. You may cover up the entire nail or just the lower half of it.

4. Take the second darkest shade and get that on the sponge, preferable on a clean edge of the sponge. Avoid using an edge that already has dried-up nail polish. Otherwise, it would be harder to blend the colors together.
5. Sponge the second color only on the two-thirds of the nail (or upper half if you have shorter nails). Pat more lightly as you go downward to blend the color with the lightest one you applied earlier.

6. Take the darkest shade and get that on a clean edge of the sponge.
7. Sponge the color only on the tip of the nail. Pat more lightly as you go a bit downward to blend the colors together.

8. (Optional) Apply glitter polish and cover up the entire nail to lessen the harsh edges. Or you can choose to cover up just the tip of the nail.

9. Apply top coat to protect your design and help it stay longer on your nails.

10. Clean up any mess using a Q-tips/cotton buds soaked in nail polish remover.

And that's it! Easy-peasey gradient nails. You can try experimenting with colors, too. You don't always have to do pink. You don't even have to do a monochromatic look. You can combine different colors. It's your call :)

I hope you found this tutorial helpful! Here are some of my other nail art designs made through sponging.
Are you gonna try this sometime? Lemme know! :)
 |
| Gold and Yellow Gradient Nails Read my post *here.* |
 |
| The Hunger Games: Girl on Fire-Inspired Nails Read my post *here.* |
 |
| New Year Dotted Nails Read my post *here.* |
 |
| Under the Sea Nails Read my post *here.* |
 |
| Gold and Green Gradient Nails Read my post *here.* |
Are you gonna try this sometime? Lemme know! :)
Thanks for showing us the technique! something i can do!:)
ReplyDeleteIt's soo pretty <3 <3 Love golden polishes!!!!
ReplyDeleteThis is really pretty! great technique
ReplyDeleteLove the technique! Thanks for this tip! Can't wait to try it out! :) - Dawn
ReplyDeletewhere can u buy nail art stuffs here in ph? :D
ReplyDeletethe color is so yummy, you really so patient to make something like this aya! :D
ReplyDeletenice one. I still haven't found a local store in cebu that sells nail art tools..hahayz..
ReplyDeletethanks for sharing this tut sis! :) i'm really lazy to do anything with my nails nowadays but nakakainggit din haha! :)
ReplyDelete@Ava, no prob!:)
ReplyDelete@Rakshanda, thank you!
@Sidrah, and easy :D
@Dawn, yey!Lemme know how yours works out, k? :)
@Gellie, I buy mine at Trinoma (Landmark Dept. Store). But the sponge you can get from Saizen/Daiso or from Etude House :)
@Cominica, haha that's because I have so much free time :P
@Hollie, aww. There's none sa department store sis, beauty section?
@Sugar, haha go go go nail artsy na rin! :D
It's so pretty! Your fingernails and fingertips are too cute. :)
ReplyDeleteThanks Rae! :D
ReplyDeletehi aya. i'm diane and a complete newbie at beauty/fashion blogging.i'm a filipino too and now a follower of your blog.i love it so much. hopefully you can follow and help support a fellow filipina's blog at http://slavetovanity.blogspot.com. i would really appreciate it. thanks in advance. salamat ganda ;D i love the color of your nails by the way.
ReplyDelete@Ava, no prob!:)
ReplyDelete@Rakshanda, thank you!
@Sidrah, and easy :D
@Dawn, yey!Lemme know how yours works out, k? :)
@Gellie, I buy mine at Trinoma (Landmark Dept. Store). But the sponge you can get from Saizen/Daiso or from Etude House :)
@Cominica, haha that's because I have so much free time :P
@Hollie, aww. There's none sa department store sis, beauty section?
@Sugar, haha go go go nail artsy na rin! :D
It's so pretty! Your fingernails and fingertips are too cute. :)
ReplyDeleteThis is really pretty! great technique
ReplyDeleteThanks for showing us the technique! something i can do!:)
ReplyDeleteJust noticed your comment. But anyway, following you already pala :D
ReplyDeleteThanks dear :)
This reminds me of Etude House's nail polish sets :)
ReplyDeleteOh yeaaaah! I don't have one of those, though. Been meaning to get some. Meanwhile, I'll stick to this technique. Hi hi
ReplyDeleteThank you :D
ReplyDeleteDone reading :) Alam mo na! Im goanna use na the sponge today! :)
ReplyDeletewow that is so cool and easy to do. thanks for the step by step tutorial. :D
ReplyDeletehttp://beautychaseandrandomness.blogspot.com/